In the previous tutorial, we learned how to transmit data over USART. By using simple functions, we can send or read bytes/arrays. We learned how to do this very efficiently with interrupts and buffers. But when things become more involved and our data messages have to be somehow formatted, our send and receive functions would begin to grow tremendously. Don’t waste your time figuring all out. AvrLibc has an excellent standard library stdio.h, which is specially designed to deal with formatted data streams. This library offers superior functionality but also takes a significant amount of code space and program speed. So before use, it makes sure your program isn’t time critical or won’t take more code space then AVR can hold.
Tell linker your intentions
The heart of stdio.h library is a vfprintf() (and vscanf() for scan) function that does all background string conversion when one of the print functions is called. Depending on linker options, it can act a bit differently. Three options can be selected: standard with no float conversions, minimized, and with float. If you create projects with WinAVR, AVR Studio, or other AVR GCC tools by default, linker options are set to standard with no floating point conversions. Use minimized version if you only need to send strings with raw integer numbers. To do so, use linker option:
-Wl,-u,vfprintf -lprintf_min
In other hand, if you need to a floating point functionality, use standard option with floating point conversions:
-Wl,-u,vfprintf -lprintf_flt -lm
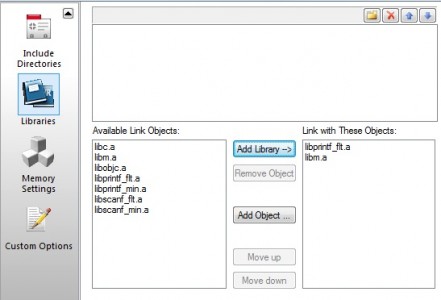
To add linker options in AVR Studio 4 open project options. Go to Custom Options and add -Wl,-u,vfprintf to Linker options:
Then go to Libraries and add libprintf_flt.a and libm.a as float conversions require math library.
The same applies to scan functions. If you intend to do reading data from streams, then also include one of the following linker options:
-Wl,-u,vfscanf -lscanf_min – for minimized version, and -Wl,-u,vfscanf -lscanf_flt -lm for float version.
Setting up an O/I streams
So far, we have set up an environment ready to support streams. We need to set up streams where we want our data to be sent and received. You can set up any number of streams, like for LCD, USART, ports, I2C, SPI, ADC, and so on, because stream concept is independent of implementation. We just have to provide device implementation to stream handler. It is a simple byte send or receive function in a suitable format. So before setting up a stream, we have to prepare function that will be used in the stream. For instance, sending a byte to USART has to be written in the following form:
int USART0SendByte(char u8Data, FILE *stream)
{
   if(u8Data == '\n')
   {
      USART0SendByte('\r', 0);
   }
//wait while previous byte is completed
while(!(UCSR0A&(1<<UDRE0))){};
// Transmit data
UDR0 = u8Data;
return 0;
}
Receiving byte function:
int USART0ReceiveByte(FILE *stream)
{
uint8_t u8Data;
// Wait for byte to be received
while(!(UCSR0A&(1<<RXC0))){};
u8Data=UDR0;
//echo input data
USART0SendByte(u8Data,stream);
// Return received data
return u8Data;
}
Reading bytes from USART is very straight forward which will wait until any data is received. More efficient would be using buffered receive. As for now, it will work for demonstration.
Now we are ready to prepare stream itself. To do so, we write following code line:
FILE usart0_str = FDEV_SETUP_STREAM(USART0SendByte, USART0ReceiveByte, _FDEV_SETUP_RW);
As we can see, we are creating a FILE type stream. We have to use FDEV_SETUP_STREAM written in uppercase, then goes our send and receive functions. Any of them may be excluded by leaving NULL between commas in case we only need to send data. And the last parameter of the function is a flag which indicates whether data need to be:
read - _FDEV_SETUP_READ;

written - _FDEV_SETUP_READ;

read/written - _FDEV_SETUP_RW.
Now we have stream ready to be used. Just one crucial thing – that makes things even more straightforward. By default, there are three streams in standard C. In computers, these streams are being used to read from the keyboard – stdin (standard input stream –), output to screen – stdout (standard output stream –), and one more output to screen – stderr (standard error stream). As we are working with microcontrollers, these aren’t initialized at program start-up, so that they can serve as any stream. To do so, we only have to assign our stream pointer to one of these standard streams like this:
stdin=stdout=&uart0_str;
Using standard streams allows us using printf() like functions where destination stream argument isn’t required. This leads to more compact code and better execution as there is one less parameter to be passed to stack when called. Otherwise any general stream must use fprintf(usart0_str, …) like function.
Print format
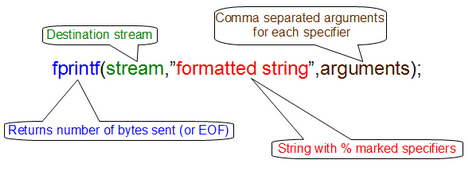
Before using print functions like int fprintf(FILE*, const char*, ) we need some understanding of formatted data output. Lets take what ‘printf’ function consists of:
If using standard stream function would look like Let us look closer at printf(formatted string, arguments); specifiers as they are the key of formatted strings. They allow passing and converting arguments into strings. This is where most resources are eaten. The general structure of specifier consists of several tags (optional in angle brackets) starting with “%” symbol:
%[flag][leading][width].[precision][length]specifier
Each tag has a set of parameters that can be used in various cases. Usually, these you can find in any C tutorial. So lets go through them on the fly.
Flag can be:
space – that can usually is filled if number sign is present;
- forces to use plus/minus sign to a positive/negative number;
– Used with o, x, or X specifiers, the value is preceded with 0, 0x, or 0X, respectively, for values different than zero; Used with e, E, and f forces output to contain a decimal point even if no digits would follow; Used with g or G the result is the same as with e or E, but trailing zeros are not removed.
Leading – print a leading zero(ignored for negative numbers);
Width – minimum field of characters to be printed. Padded with spaces if the result is shorted and truncated if longer. If * is used, it represents integer number taken from the argument list.
Precision – represents the number of digits after the decimal point for double numbers. For integers, this number shows the minimum number of digits to be printed. If the number is shorter – leading zeros are added; if longer- it is truncated. It also can be specified as * and value taken from arguments.
Length – can be h, l, and L. used for argument compatibility where h – stands for short int, l – long int, and L – long double.
Specifier – this is a mandatory specifier. It defines value type of corresponding argument:
- c – character (eg. a, C, …);
- i, d – decimal integer (eg 10, -23);
- u – unsigned integer (eg. 100);
- e, E – scientific format (eg. 1.2e01, 5E21);
- f – decimal floating point (eg. -5.014);
- g, G – shorter e or f (eg. -5.02, 5E2);
- o, O – octal unsigned integer (eg. 457);
- x, X – unsigned hexadecimal (eg. 1f8, FF4);
- s – string of characters (eg. Hello);
- p – pointer address;
- n – associated argument points to int variable, which holds a current count of printed characters;
- % – % followed after % prints character %.
In AVR GCC stdio.h library some IO functions are limited it can be that some tags or specifiers won’t work. I haven’t tested them all. So If you know, non-working specifiers from the list above, let us know in comments.
It is important to note that the sequence of arguments must be the same as specifiers used in the string. If you miss things, results will be unpredicted.
Testing I/O stream functionality
And finally here is a working program example with some test prints. Scanf() function is also used in the endless loop to read characters from the terminal.
#include <stdio.h>
#include <math.h>
#include <avr/io.h>
#include <avr/pgmspace.h>
#define USART_BAUDRATE 9600
#define UBRR_VALUE (((F_CPU / (USART_BAUDRATE * 16UL))) - 1)
void USART0Init(void)
{
// Set baud rate
UBRR0H = (uint8_t)(UBRR_VALUE>>8);
UBRR0L = (uint8_t)UBRR_VALUE;
// Set frame format to 8 data bits, no parity, 1 stop bit
UCSR0C |= (1<<UCSZ01)|(1<<UCSZ00);
//enable transmission and reception
UCSR0B |= (1<<RXEN0)|(1<<TXEN0);
}
int USART0SendByte(char u8Data, FILE *stream)
{
   if(u8Data == '\n')
   {
      USART0SendByte('\r', 0);
   }
//wait while previous byte is completed
while(!(UCSR0A&(1<<UDRE0))){};
// Transmit data
UDR0 = u8Data;
return 0;
}
int USART0ReceiveByte(FILE *stream)
{
uint8_t u8Data;
// Wait for byte to be received
while(!(UCSR0A&(1<<RXC0))){};
u8Data=UDR0;
//echo input data
USART0SendByte(u8Data,stream);
// Return received data
return u8Data;
}
//set stream pointer
FILE usart0_str = FDEV_SETUP_STREAM(USART0SendByte, USART0ReceiveByte, _FDEV_SETUP_RW);
int main (void)
{
//sample data
uint16_t u16Data = 10;
double fltData = 3.141593;
int8_t s8Data = -5;
uint8_t u8str[]="Hello";
uint8_t u8Data;
//Initialize USART0
USART0Init();
//assign our stream to standart I/O streams
stdin=stdout=&usart0_str;
//print unsignet integer
printf("\nunsigned int = %u",u16Data);
//print hexadecimal number
printf("\nhexadecimal unsigned int = %#04x",u16Data);
//print double with fprint function
fprintf(stdout,"\ndouble = %08.3f", fltData);
//print signed data
printf("\nsigned int = %d",s8Data);
//print string
printf("\nstring = %-20s",u8str);
//print string stored in flash
printf_P(PSTR("\nString stored in flash"));
//printing back slash and percent symbol
printf("\nprintf(\"\\nstring = %%-20s\",u8str);");
    while(1)
    {
    printf_P(PSTR("\nPress any key:"));
    //scan standard stream (USART)
    scanf("%c",&u8Data);
    printf_P(PSTR("\nYou pressed: "));
    //print scaned character and its code
    printf("%c; Key code: %u",u8Data, u8Data);
    }
}
The results we can see in the terminal window:
This program uses floating point variables, so we need to set linker to use float options in linker settings as we discussed above. Don’t forget that printf functions can also be used to print to LCD or any other peripheral. As stream operations aren’t hardware specific – same stream functions can be redefined for a different device. The same messages can be sent to USART or LCD if needed – only one hardware function has to be changed. Stdio.h library has lots of useful features that may be used in different circumstances so go, look around, and take advantage while using standard I/O library.
Download AVR Studio 4 project: ioexample.zip


Great tutorial!
You could save a lot of RAM space by using printf_P everywhere.
Thank you very much for this tutorial…!!!
It helped me a lot in my project
Great tutorial. Thanks.
hi please i am doing a small project on atmega32 to control leds using pwm pins
void pwm(int dutya,int dutyb, int dutyc)
{ OCR0=dutya;
OCR1A=dutyb;
OCR1=dutyc;
}
i have different colour leds control by each pwm pin
i want a way to pas the arguments as a string using a keyboard so that i could change which one gets brighter at anytime.
How using standard I/O streams with an UART working in interrupt mode? Do I have to insert a buffer between the UART interrupt routines en the USART0SendByte and USART0ReceiveByte or works the stream as buffer?
HI, haven’t tried this options. I think stream itself should work as buffer. Will get to this some time to test out.
Thanks.